Introduction
Remote access for internal devices allows users to securely connect to a private network from outside and control devices. There are many methods allow users to set up the remote access and port forwarding is the easiest and most common method.
Virtual servers are commonly used by small businesses and individuals to host websites, run databases, manage email systems, or test software in separate environments. Compared to purchasing multiple physical servers, virtual servers offer benefits such as lower cost, greater flexibility, and easier backup and recovery. Combined with tools like port forwarding or VPNs, users can securely access their virtual servers remotely for centralized management and remote operations.
Please note that this example is based on specific prerequisites and topology. D-Link does not guarantee compatibility with all platforms or clients.
Prerequisites
Network Topology
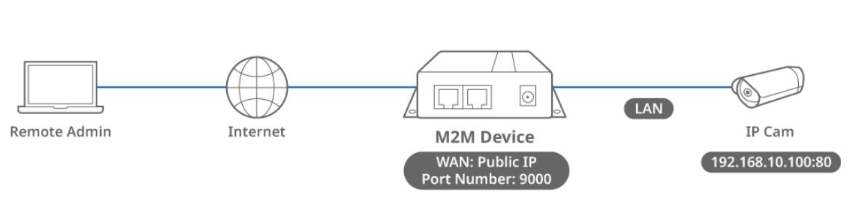
This topology diagram illustrates a typical port forwarding application that enables remote users to access the cameras connected to D-Link M2M equipment.
Typically, D-Link M2M devices are deployed in remote locations with public IP 62.x.x.x , and administrators want to access cameras web under D-Link M2M with private IP address : 192.168.10.100. Therefore, port forwarding is a useful technology.
Port Forwarding Configuration
Before port forwarding configuration, please check WAN interface status and make sure your M2M router/gateway WAN interface already obtained a public IP address.
Go to Status > Basic Network > WAN & Uplink Tab

1. Enable Port Forwarding: Go to Network> Port Fowarding
2. Enable Virtual Server in configuration tabs
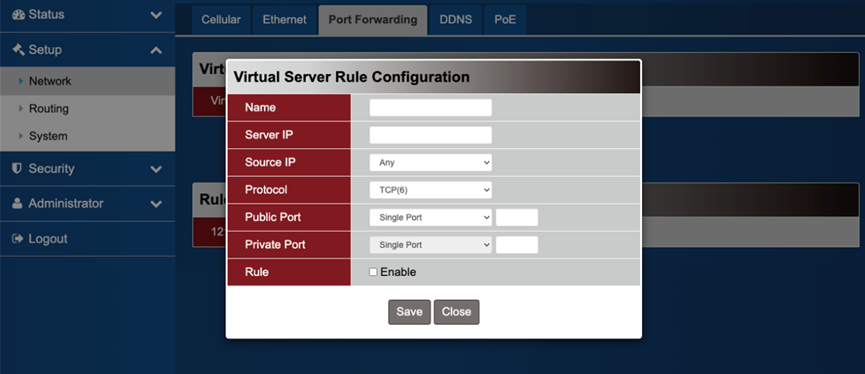
3. Click Add to add virtual server rule
| Item Name | Descrption |
|---|---|
| Name | Enter the rule name |
|
Server IP |
Enter the Internal PC IP 192.168.10.100 |
| Source IP | Select Any from drop down menu |
| Protocol | Select TCP from drop down menu |
| Public Port | Select Single Port and enter 9000 |
| Private Port | Select Single Port and enter 80 |
| Rule | Click Enable box to activate this rule |
| Save | Click Save button to save the settings |
Test Result
1. Following the configuration steps outlined above, you can proceed with verification to ensure its proper functionality.
2. Enter 61.x.x.x:9000 (M2M WAN IP with 9000 Port) into your browser.
3. The web page for the camera with IP 192.168.10.100 is displayed.