VLAN
Introduction
Virtual LAN (VLAN) is a technology that segments a single physical network into multiple isolated broadcast domains. It enhances network security, improves performance, and simplifies management by grouping devices based on function, department, or access level rather than physical location.
M2M supports both Port-based VLAN and Tag-based VLAN. These functions allow you to divide local network into different “virtual LANs.” This is especially useful in industrial M2M environments, smart gateways, and branch offices to isolate traffic between systems such as PLCs, IoT sensors, and admin PCs.
In this example, we will demonstrate Port-based VLAN configuration of an M2M device.
Prerequisites
Before configuring the VLAN on the M2M device, ensure that the following prerequisites are met to avoid misconfigurations and to guarantee proper network functionality.
1. M2M device that support VLAN feature
This feature is applicable to the following models.
DWM-313, DWM-530-T, DWM-550-G, DOM-530-TSO, DOM-550-GSO, DTM-550-G
Topology
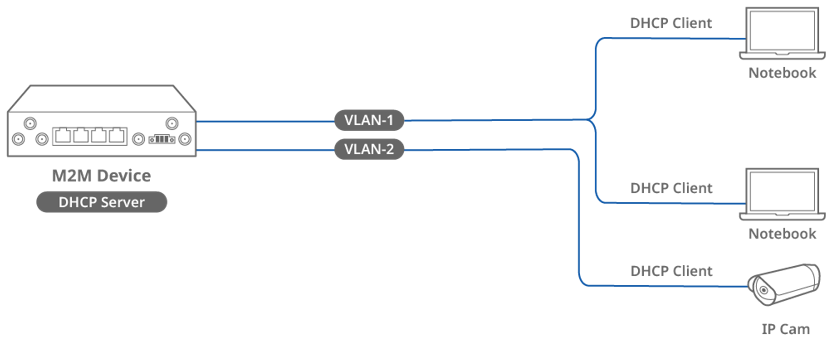
This topology features a centralized DHCP server serving two VLANs (VLAN1 and VLAN2). VLAN1 includes two DHCP clients, while VLAN2 has one. VLANs logically separate broadcast domains, improving security and traffic efficiency. The DHCP server assigns IP addresses to clients in both VLANs. Port-based VLAN1 for LAN2 and Port-based VLAN2 for LAN3.
Note: Before starting this configuration, please make sure the basic network setting of D-Link M2M Device is configured properly.
Configuration
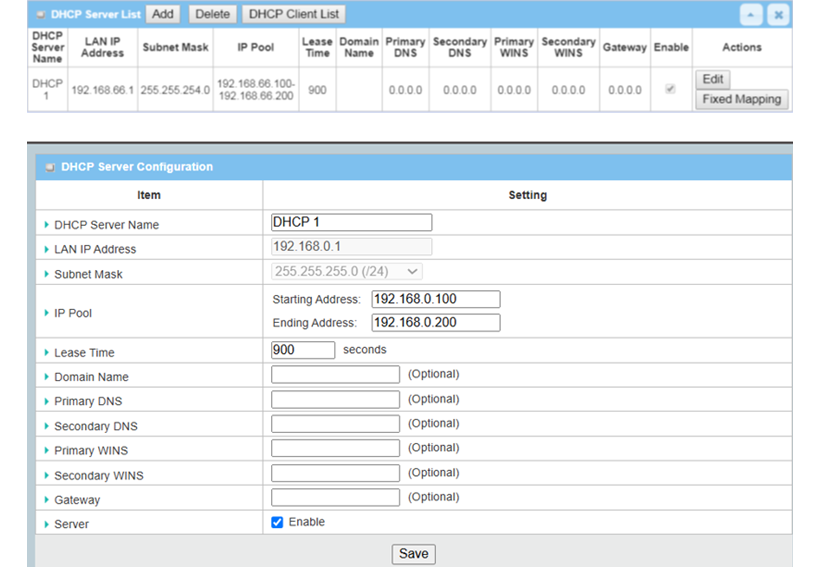
1. DHCP Server Setup Configuration:
Go to Basic Network > LAN & VLAN > DHCP Server Tab
| Item | Descrption |
|---|---|
| DHCP Server Name | Enter DHCP 1 as Server name |
| Load Balance Strategy | Load Balance Strategy |
| LAN IP Address | Enter LAN IP Address: 192.168.0.1 |
| Subnet Mask | Default: 255.255.255.0 (/24) |
| IP Pool | Starting Address: 192.168.0.100; Ending Address: 192.168.0.200 |
| Lease Time | Default: 900 seconds |
| Server | Enable |
| Item | Descrption |
|---|---|
| DHCP Server Name | Enter DHCP 2 as Server name |
| Load Balance Strategy | Load Balance Strategy |
| LAN IP Address | Enter LAN IP Address: 192.168.0.1 |
| Subnet Mask | Default: 255.255.255.0 (/24) |
| IP Pool | Starting Address: 192.168.0.201; Ending Address: 192.168.0.200 |
| Lease Time | Default: 900 seconds |
| Server | Enable |
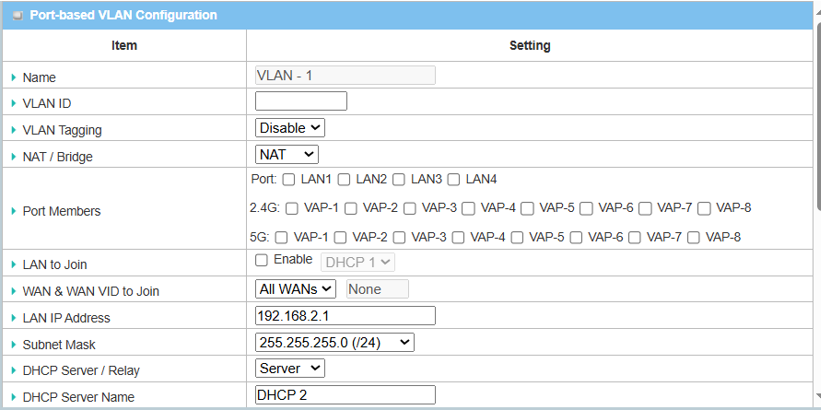
2. VLAN Setup Configuration:
Go to Basic Network > LAN & VLAN > VLAN Tab

| Item | Descrption |
|---|---|
| VLAN Types | Default: Port-based |
| System Reserved VLAN ID | Default: 1~5 |
| Item | Descrption |
|---|---|
| Name | VLAN-1 |
| VLAN ID | Enter 10 |
| VLAN Tagging | Default: Disable |
| NAT / Bridge | Default: NAT |
| Port Members | LAN 2, 3 |
| LAN to Join | DHCP 1 |
| Item | Descrption |
|---|---|
| Name | VLAN-2 |
| VLAN ID | Enter 20 |
| VLAN Tagging | Default: Disable |
| NAT / Bridge | Default: NAT |
| Port Members | LAN 4 |
| LAN to Join | DHCP 2 |
Test Result
Please set up the device according to the environment described above and configure it accordingly. Then perform validation to ensure the functionality works as expected.
1. VLAN Test Results:
The results validate the VLAN implementation meets basic requirements for segmentation and DHCP service.