
How do I set up and install my router?
This FAQ applies to hardware revision B
Step 1: Unplug the power to your Cable/DSL Internet modem

Step 2: Connect an Ethernet cable from your computer/laptop to a LAN port (port 1,2,3 or 4) on the back of the DIR-868L

Step 3: Connect your Cable/DSL modem to the Internet port on the DIR-868L using another Ethernet cable.
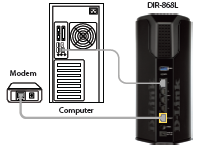
Step 4: Plug in the power for your cable or DSL broadband modem and wait for two minutes while the modem initializes.
Step 5: Power on the DIR-868L and wait until the ‘power’ LED on the front of the device turns green.

Step 6: Open an Internet browser (such as Internet Explorer) and enter http://dlinkrouter.local or http://192.168.0.1 into the address bar.
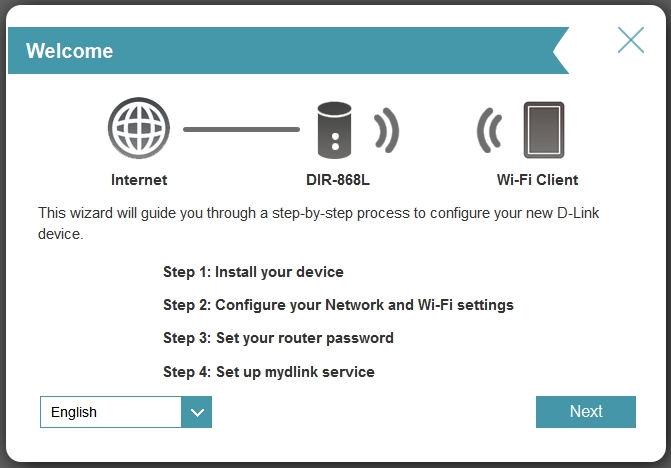
Step 7: If this is your first time logging in to the router, the Setup Wizard will start automatically.
This wizard will guide you through a step-by-step process to configure your new D-Link router and connect to the Internet. You can select a different language using the drop-down menu in the bottom left-hand corner of the window. Click Next to continue.
Click Next. The router will attempt to detect your Internet connection type.

Wait while your router detects your Internet connection type. After the router detects your Internet connection, you may need to enter information such as a username and password. This information should be provided by the company that provides your Internet, also known as an Internet Service Provider (ISP).

Step 8: If the router does not detect a valid Internet connection, a list of connection types to choose from will be displayed. Select your Internet connection type (this information can be obtained from your Internet service provider) and click Next to continue.
Select your Internet connection type: DHCP Connection (Dynamic IP Address) or Username/Password Connection (PPPoE), or Static IP Address Connection.
DHCP Connection (Dynamic IP Address) – This type of connection is most commonly used for cable Internet services. You will most likely not need to provide any extra information if you use this connection type.
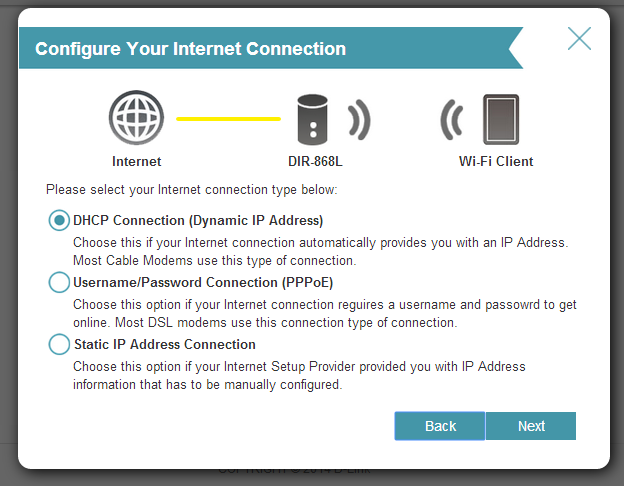
Username/Password Connection (PPPoE) – This type of connection is most commonly used for DSL Internet connections. You will most likely need to provide some additional information before you can connect to the Internet:
-
Username - Your Internet username (provided by your Internet Service Provider)
-
Password - Your Internet password (provided by your Internet Service Provider)

Static IP Address Connection – If your Internet Service Provided has supplied you with a specific IP address to use, enter the IP Address, Subnet Mask, Gateway Address, Primary DNS Address, and Secondary DNS Address supplied by your ISP.

Step 9: Enter the required information, and click Next to continue.
Step 10: For both the 2.4 GHz and 5 GHz wireless frequencies, create a name (SSID) for your Wi-Fi networks. Each Wi-Fi network will also need a password of at least 8 characters. Your wireless clients will need to have this password to be able to connect to your wireless network. Click Next to continue.
(Password suggestion: It is suggested that you choose a password that is easy for you to remember but, difficult for others to guess. Strong passwords should include a combination of letters and numbers).

Step 11: In order to further secure your router, create a password to access the router’s web-based configuration interface. This should be different from the password to connect to the Wi-Fi network. Enter your password in the Device Admin Password field provided, Click Next to continue.

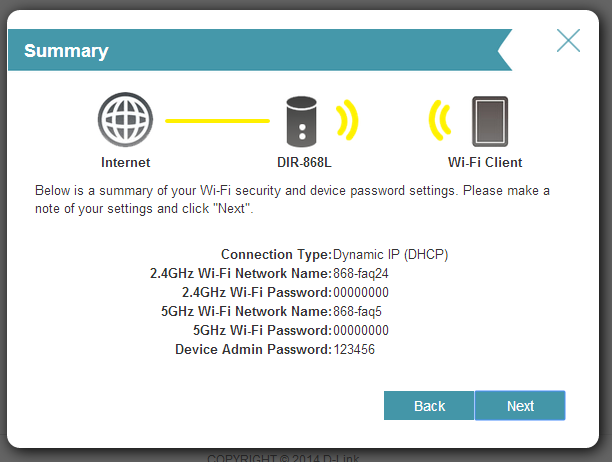
Step 12: The Summary window will display your settings. Click Next if you are satisfied, or click Back to make changes.
mydlink™ Cloud Services registration:
With mydlink Cloud Services you can remotely manage, control, and monitor your home network from anywhere using the mydlink mobile apps or mydlink web portal. You can check up on your network’s Internet activity, and see what devices are connected to your network. You can also use the mydlink SharePort app to remotely access content on a USB drive connected to your router.
You may choose Next to register this device with mydlink for free. Or you may choose Skip to register later.
To get started with mydlink Cloud Services, you are required to have a mydlink account, and need to register this router to your mydlink account. Select Yes, I have a mydlink account if you have previously registered a mydlink account; or select No, I want to register and login with a new mydlink account if you would like to create a new mydlink account.

a) If you selected “Yes, I have a mydlink account,” enter your existing mydlink account name and password. Then click Login.

b) If you selected “No, I want to register and login with a new mydlink account,” fill in the required information and check the I Accept the mydlink terms and conditions box in order to create a new mydlink account.
Note: Your mydlink password is the password to log in to the mydlink web portal and mydlink mobile apps. This is NOT the same as your router’s login information or wireless security password.

Step 13: At the end of the wizard, you will be presented with a final summary of your settings. Click Finish to close the wizard.


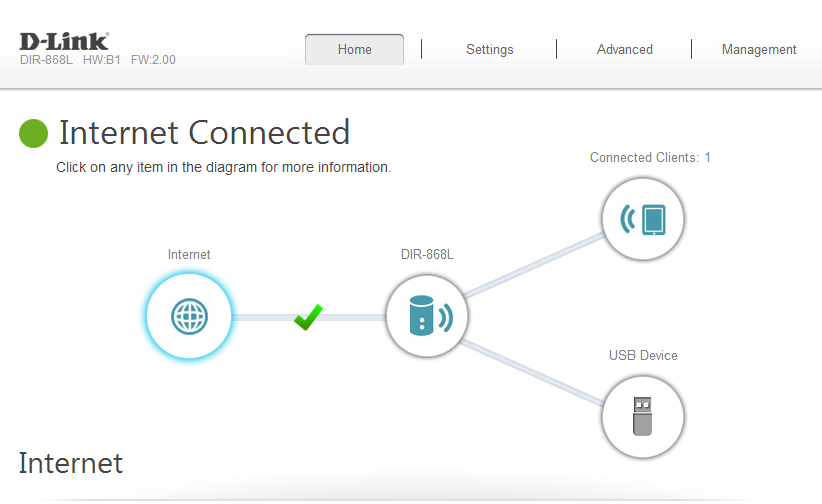
Once the changes have been saved, you will return to the main page of the router’s configuration interface. From here you can use the on-screen network map to view the current status of devices and components on your network.
20 Други потребители намират това за полезно.
Беше ли това полезно за Вас?20 Други потребители намират това за полезно.
Благодарим Ви за обратната връзка.
Съжаляваме, че не успяхме да помогнем! Натиснете тук за повече Въпроси и отговори или за да отидете в секция Поддръжка.
Това също може да Ви помогне:
- How do I reset my router to factory default settings? Прочети отговорите
- How do I back up the router’s configuration to my computer? Прочети отговорите
- How do I upgrade the firmware on my router? Прочети отговорите
- I have forgotten my wireless password, how do I recover it? Прочети отговорите